
BigCommerce Facebook Product Ads & Feeds – Complete Guide
Facebook Dynamic Product Ads • Facebook Pixel • Facebook Feed • Abandoned Cart Ads • BigCommerce
BigCommerce has a built-in integration for the Facebook pixel but unfortunately (and to our frustration) this doesn’t work for Facebook dynamic product ads or abandoned cart ads since you’ll need the “view content” event to match ID’s with products in your catalog and you’ll need the add to cart event to utilize abandoned cart ads. In this post will walk you through the entire process to get that working.
[contact-form-7 id=”7617″ title=”Blog CTA Download – Facebook Dynamic Ads Guide”]
Overview
Below is an overview of what we cover in our step by step guide to get dynamic and abandoned cart ads working:
- Adding your Facebook pixel to your BigCommerce website
- Adding Google Tag Manager to your website
- Adding Google Tag Manager data layer variables to BigCommerce
- Creating custom variables in Google Tag Manager
- Adding the Facebook “Add to cart” event through Google Tag Manager
- Testing & Verify the Facebook pixel
- Creating your Facebook product feed from BigCommerce
- Uploading your product feed to your Facebook Catalog
Add Your Facebook Pixel to BigCommerce
The first step is to add your Facebook pixel ID to your BigCommerce site. You can find your Facebook pixel in Facebook Business Manager under Events Manager or Business Settings > Data Sources > Pixels.
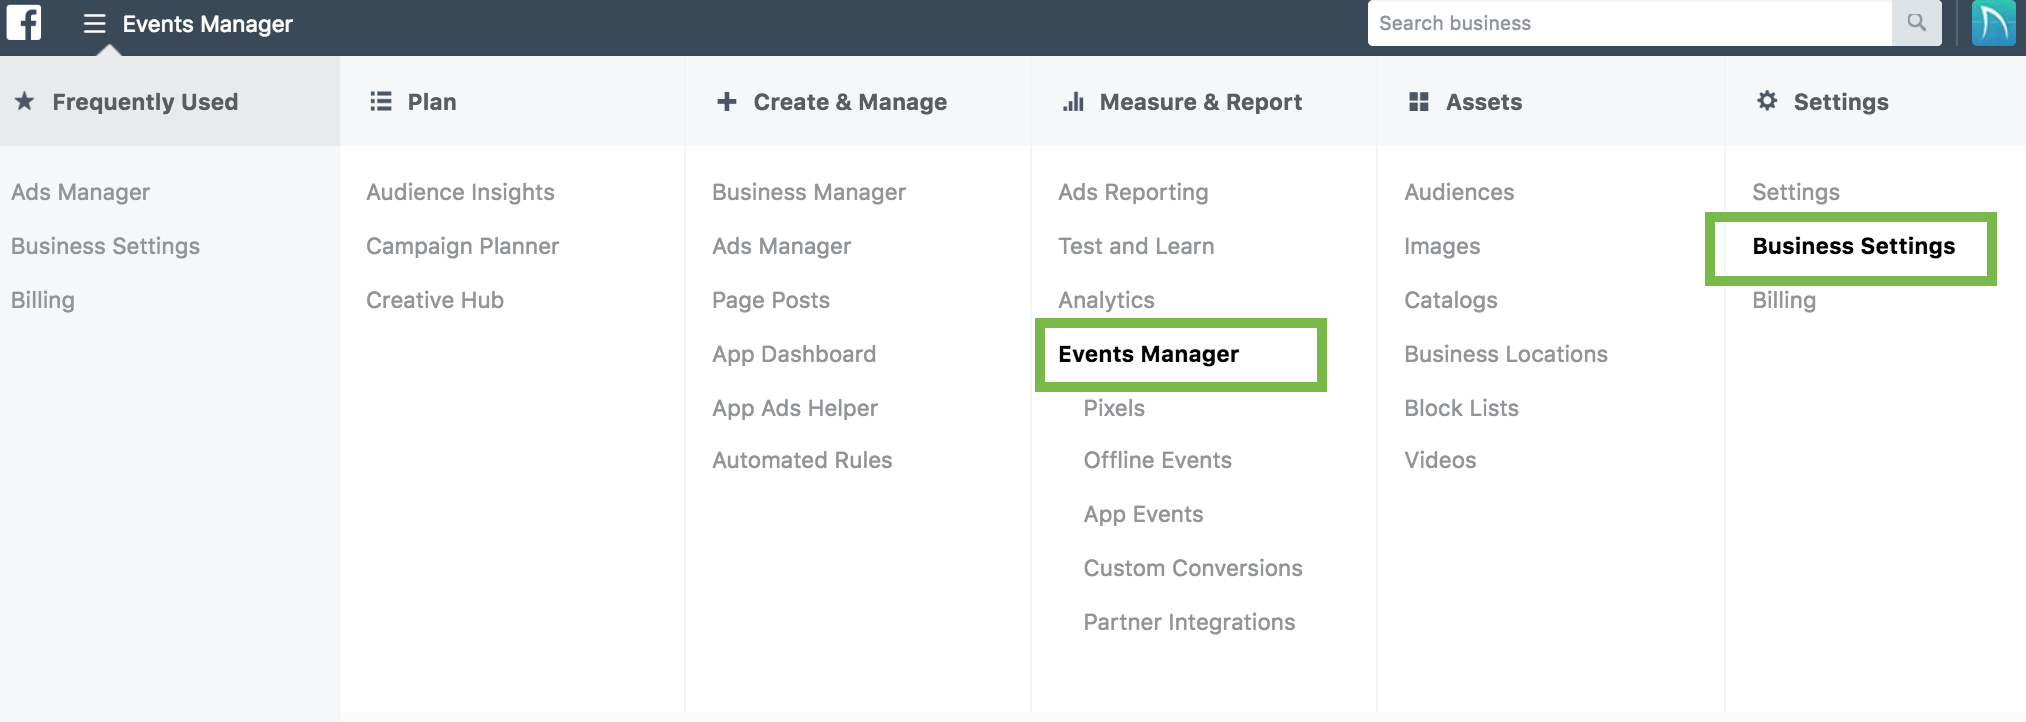
Copy your pixel ID and add it in your BigCommerce backend by going to Advanced Settings > Web Analytics > then make sure Facebook Pixel is checked which will allow you to click the Facebook Pixel tab and you can paste your pixel there.
The Problem with BigCommerce and the Facebook Pixel?
Unfortunately you’re not done yet.
The problem is that BigCommerce doesn’t add the “add to cart” Facebook event automatically. Other events we’ll want including View Content, Page View, View Category, Initiate Checkout, Purchase, etc. should be added automatically, but can be dependent on your theme.
We’ll talk about verifying pixel events later.
There are a few ways to fix the missing addToCart event, but the simplest way I found was to do this through Google Tag Manager. You can also fix this by manually adding a script to the product details theme files but I’m not going to cover that in this post. (Feel free to reach out to us, and we can provide you with those instructions)
Adding Google Tag Manager to Your Website
The first thing you’ll need to do is add Tag Manager to your site, if you’ve already done this you can skip to the next section. To add Google Tag Manager to your site first you’ll have to make sure you have an account. If you don’t you can go here (Google Tag Manager Link) and set up an account.
Once you’re in your GTM account you’ll need to create an account/container. You can do this by clicking create account. Type in your Account Name (Company Name) then Container Name (Company Name – Website) and click “Web” square, then create.
Now you’ll need to add GTM to your site, to do this click on the ADMIN tab within GTM. Then you’ll need to go to the “Install Google Tag Manager” option. Here you’ll see you two sections of code to be added to your site and in different sections.
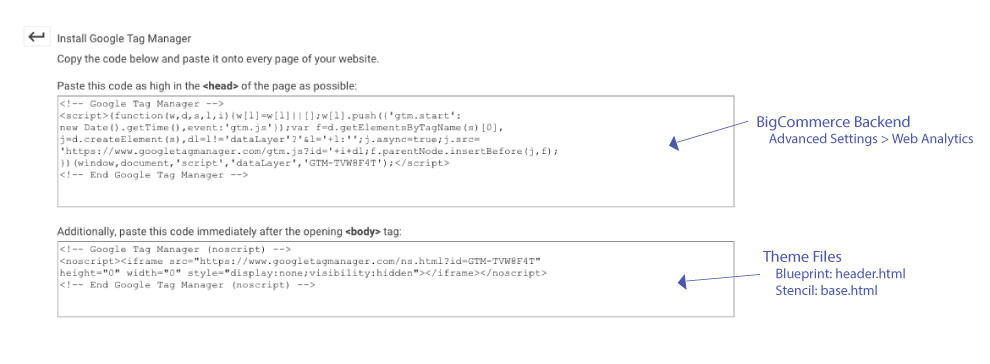
Copy the code in the top box that will go in the <head> section of your site. You can add this code to your site by using the script manager found in Storefront > Script Manager. You can title the script tag, select “Head” for location on page, then “All pages” and “Script for script type.
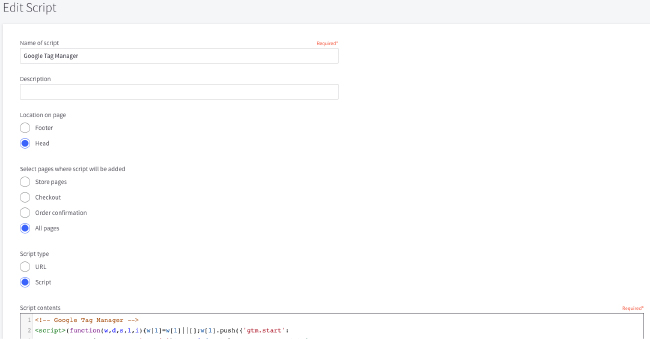
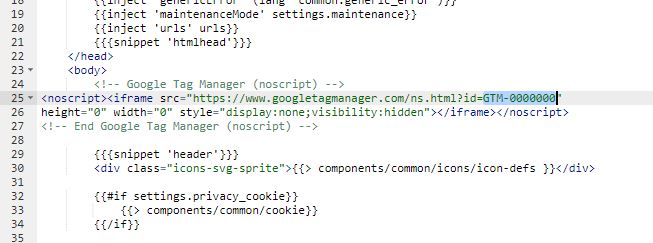
Now go back to GTM and copy the code in the bottom code box section. (Admin > Install Google Tag Manager) This pixel Google wants you to add immediately after the opening body tag but there is no perfect way to do this currently as BigCommerce doesn’t give you the ability to add scripts to the body section. You can, however, do this by adding it after the body tag in the base.html theme file (for Stencil).
To get there you’ll want to go to Storefront > My Themes > Advanced (drop-down) > Edit Theme Files > then see below based on what type of theme you have:
Stencil
Templates (folder) > layout (folder) > base.html
Copy the code right after the opening body tag on the html file and click save.
Blueprint
Panels > header.html
Copy the pixel to the top of this html file and click save.
Using a Data Layer for BigCommerce Variables
Using data layer variables will allows us to pass BigCommerce variables such as “product ID” and “price”, and use them in Google Tag Manager tags and scripts. Learning how to use variables in tag manager can be very useful for conversion tracking, anytime you want to pass dynamic variables, or for setting up Analytics eCommerce Tracking.
The first thing you’ll need to do is add a simple data layer script to your theme files in BigCommerce. This will allow you to pass required variables with the Add to Cart event. You can do this through the Script Manager as well. For settings use Head, Store pages, Script then copy one of the scripts below depending on whether you have Blueprint or Stencil themes.
Blueprint
Edit this file: ProductDetails.html
Best way to find it is to use CRTL + F to find and search for it.
You can paste the code below pixel in the script contents section:
Stencil
You can paste the code below in the script contents section:
Note: I have separated each variable into separate scripts, usually I would combine them into the same script and pass both variables but for some reason that stopped working for me which is why I know you two separate script tags.
Once you’ve added the script click Save.
Adding Custom Variables to Google Tag Manager
Go into your Google Tag Manager account and click on the Variables tab. You’ll then want to click “NEW” under User-Defined Variables.
Product ID Variable
For the first one let’s use “Product Id” for the title. In the Variable Configuration once you click in that box you’ll want to select “Data Layer Variable”. It will then ask for a “Data Layer Variable Name” and this will be the variable we already defined when we added the script through script manager. For product id you’ll want to use “productId” exactly, without the quotes of course. Then click Save and publish.
Product Price Variable
Here you’ll want to do the same exact thing but use “Product Price” as the title and “productPrice” in the “Data Layer Variable Name“, again you must use the text exactly: productPrice. Then again click Save and Publish.
Now those variables like product price and product Id will be able to be passed with the Add to Cart event through Google Tag Manager.
Adding the “Add to Cart” Event Through Google Tag Manager
Now that you have the data layers and Google Tag Manager is on your site you’ll want to add the “Add to cart” event script.
To do this go to your tag manager account then click Tags > New. Title it something like “Facebook Add to Cart Event” and click in the Tag Configuration section > Custom HTML and in the HTML box you’ll want to copy and paste the script below exactly.
NOTE: The Product Id & Product Price used below within the “curly brackets” are the titles we used in Google Tag Manager when we created the custom variables in the previous step, so you’ll want to make sure they are the same. Another way of making sure you are using the correct value is when you paste the code if you delete the highlighted yellow portion you see here: {{Product Id}}, and type another curly bracket “{” Tag Manager will give you a list of predefined and custom variables you can select from.
Stencil & Blueprint
Then click into the Triggering section.
Google Tag Manager Trigger Settings
Now you’ll want to click the blue plus in the top corner and under the Click section you should see “All Elements” with a mouse icon, select that. Then select “Some Clicks”, in the first drop-down select Click-Element (if it doesn’t show up you might need to select “Choose Built-in Variable”. Then you’ll want to select “matches CSS selector” and in the last box you’ll want to copy and paste the blue text below:
Stencil:
#form-action-addToCart
Blueprint:
.add-to-cart
Then you’ll want to click submit and publish, which will make the event pixel live on your site.
Testing to Make Sure It’s Working
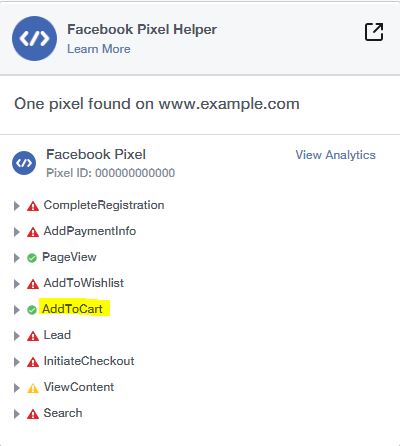
It’s important to make sure this event pixel is working. The best way to this is to install the Facebook Pixel Helper chrome extension. Once this extension is installed and enabled go to a product page on your site. Once there click the Facebook Pixel Helper extension and you should be able to see the Facebook events fired on this page. It should look something like the below image:
![]()
Now you’ll want to click the Add to Cart button and check the Facebook pixel help extension again. Now you should see “AddToCart” with a green checkmark next to it which means it is firing properly. If you don’t see it then the event pixel is not firing.
You’ll also want to make sure it is passing the information correctly, so if you click on the arrow to expand it you can see what data is being sent. In the image below in the green box, you’ll see content_type is “product_group” which what you want, content_ids is “314” in this case but that is a dynamic variable and should be set to whatever the product id is for the page you are viewing. Value should be the price of the product and currency should be “USD” if that is the currency you use.
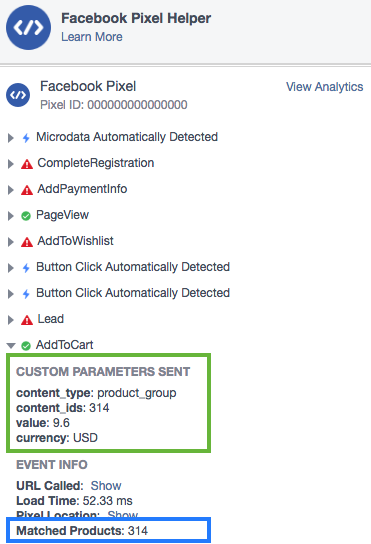
In the blue box, the pixel helper is telling us if the product has matched to a product ID in our Facebook Product catalog. If you have set this up yet it will say “Unmatched products” but if you have it should say Matched if it was set up properly. Below are instructions on how to set up the product feed with a BigCommerce product export.
Creating the Facebook Product Feed
This step can be tricky so you’ll need to pay attention closely to this process. The trick with this process is you want to make sure the feed you give Facebook is able to match up “View Content” events (or a page view of a certain product) with the Product or Group IDs in the product feed.
Facebook allows you to submit a feed with Product ID’s or Product Group ID’s (item_group_id, for the import field). It’s important to know the difference as Facebook won’t be able to match a page view with a product in your feed if it’s not set up properly. Typically you would use product ID for simple products without additional options (color, size, etc) but BigCommerce uses Product Group automatically which can still work fine.
To make sure BigCommerce is using the Product Group Id you can view it by using the Facebook pixel helper and clicking on the View Content arrow and under “CUSTOM PARAMETERS SENT” you should see “content_type: product_group” if for some reason it just say “product” instead of product_group then you’ll just need to make sure you add the product ids from BigCommerce to the product id column instead of group id in the Facebook feed CSV file, which I’ll cover.
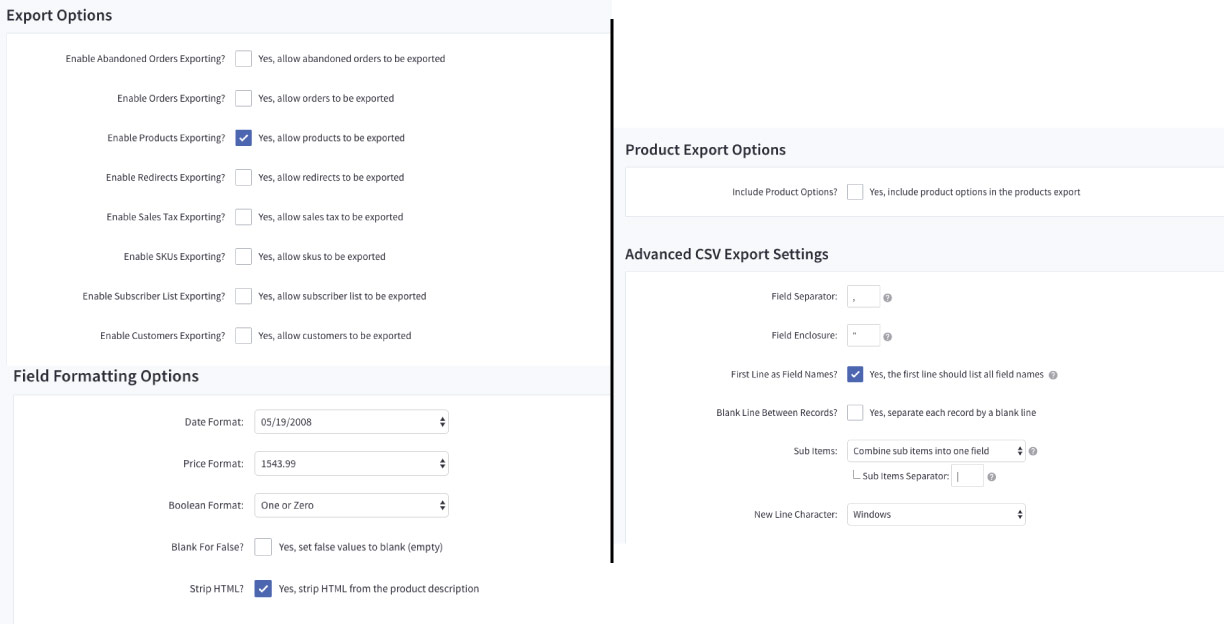
The first step to creating the product feed is to export your product from BigCommerce. To do this in the BigCommerce back-end you’ll want to go to Products > Export. Choose the Bulk Edit template, click Continue and then Export my products to CSV and download the file.
NOTE: The easiest way I found to do this was to create your own custom export. You can do this by going to Products > Export > then click the blue “Export Templates” link at the top. Below are the options I selected:
Export Fields Image Link: Bigcommerce Custom Export Template Fields to Select
The BigCommerce export file is going to export everything including Rules and SKU’s but you won’t need those items. In Excel you’ll want to select the column “Item Type” then click the Data tab then Filter. Now you’ll want to click the filter drop-down in the “Item Type” cell and un-check everything but product. This will give you a list of just products which you’ll then want to highlight everything and copy it and then paste it to another sheet by using paste special > values only. Now that you have just your products you’ll want to download the Facebook Product Feed template below.
Facebook Feed Template:
The next step is to copy the proper columns from you export over to the Facebook Feed template. You won’t need to complete every column the required columns for Facebook are below along with the associated BigCommerce export fields:
| Facebook Catalog Import Fields | BigCommerce Export Fields | Recommended FB Import Values |
| Id | Product ID | Same as BigCommerce Product IDs |
| title | Product Name | Same values |
| description | Product Description | Same values |
| product type | NA | User generated (recommend using product categories) |
| link | Product URL* (See below) | Must add “www.yourdomain.com” to the beginning for the product URL path |
| image link | Product Image File – 1** (See below) | Must add “www.yourdomain.com/product_images/” to the beginning of the BigCommerce Image File pathname |
| condition | Product Condition | new, used or refurbished |
| availability | NA | in stock, out of stock, preorder |
| price | Price | Same values |
| Gtin, mpn, or brand (need one of these) | Brand Name, Product Code/SKU or GPS GTIN | Recommend using brand name or MPN with SKU if you don’t have GTIN’s |
| item_group_id | NA | If your event pixels (“view_content” or “add_to_cart”) show “content type: product_group” then you’ll need this. We recommend using the same values as Id/Product ID |
*Product URL
You’ll need the go through a similar process with the product URL’s by adding “www.yourdomain.com” to the beginning of the value in the export field.
**Product Image File – 1
The BigCommerce export file only exports the file path and not the full URL so you’ll need to use some excel magic like the function “Concatenate” to add the beginning portion of the full URL which would be “www.yourdomain.com/product_images/” to all the image path URL’s in the export.
Once you have all the required filled in with the correct data from the BigCommerce export in Excel you can now save the file as a CSV.
Uploading the Product Feed to Facebook
You’ll now want to go back to your Facebook Business Manager and use the hamburger menu at the top left to navigate to Catalog Manager. Here you can click Create Catalog > E-commerce then title the catalog and click Create.
Now that the catalog is created you’ll need to upload your feed. In the catalog go to Product Catalog Data Sources > Add Data Source > Use Data Feeds > Upload Once > Start Upload.
NOTE: This won’t update your product catalog as you make changes on the site so you’ll need to re-upload a new product feed as you add or remove products. You can use the Facebook pixel to dynamically update product but you need to implement proper Schema or Open Graph data to you theme for it to work.
The upload will take a few minutes but once it is uploaded you should be able to see the products in the product tab. Now you’ll need to connect your catalog to your pixel. You can do this by going to Settings > Event Sources, here you can add the same pixel that is on your site and it will connect the catalog with you onsite pixel for tracking product views.
Testing to Make Sure Your Catalog and Onsite Facebook Pixel are Connected Properly
To do this go to one of your product pages and do a hard refresh (Control + Shift + R) this will refresh your cache. Now click the Facebook Pixel Helper and if your website pixel is talking to your Facebook catalog properly (by matching content_id to item_group_id) you should see a green checkmark next to “ViewContent”. You should also see the “Matched Products” at the bottom which means Facebook is matching a website view a certain product to a product in your Facebook Catalog.
![]()
Now Facebook will be able to track visitors that viewed certain products and you can use dynamic product remarketing ads to serve those relevant product ads to recent website visitors. I won’t go into too much detail on this in this post but you’ll need to create a custom audience of website visitors in order to do so.
Additionally, abandoned cart ads work great by targeting visitors that have added products to their cart but didn’t purchase. Facebook allows you to reach those users with the products in a carousel that the user added to their cart. Easy money!
[contact-form-7 id=”7617″ title=”Blog CTA Download – Facebook Dynamic Ads Guide”]
How Can AdShark Marketing Help
Are you struggling with setting up your Facebook Dynamic Product Ads through BigCommerce? We can help. We are an Elite BigCommerce Partner and work with BigCommerce sites every day. Ready to try an agency? Fill out our form and we can provide a free proposal to help with ecommerce marketing, Facebook Ads, Paid Search, Website Design or Search Engine Optimization.
Hopefully, you found this guide to be helpful. If for any reason you ran into issues and couldn’t figure something out feel free to reach out as we’re more than happy to help.
Ready To Grow?
Let's Talk!
