Update Facebook Product Feed With Facebook Pixel Microdata – How to Guide
Facebook recently launched a new feature to allow eCommerce companies to update their product catalog using the Facebook pixel. While this can be super useful it’s important to be aware of how it works so you know when and how the product will be added or updated. In this post, we’ll cover how it works, how to get it set up, and settings you’ll want to be aware of.
How Does It Work?
When you have the proper schema or open graph data implemented on your site you can choose to all Facebook to use the “microdata” to update your Product Catalog. This works great if you don’t have a custom feed that already does this and you end up doing it manually. When setting up the Facebook pixel as a data source you can choose to have it update products as well as add new products.
This is great, however, it will only add new products to your catalog when a website visitor views that particular product. So initially, if a product is not in your catalog and a customer visits that product page, the pixel won’t match the “View Content” or “Add to cart” event for that initial visitor. The microdata that was passed through the Facebook pixel when the customer viewed that product page would then be pushed to your Facebook catalog and would add the product to your catalog (if that’s how you set it up anyway). This does take some time though, I’d estimate 10-30 minutes or more until the product is added to your catalog.
How Do I Set This Up?
Step 1 – Enable Facebook Microdata on Your Website.
You can do this by adding the below pixel to every page of your site and replacing the PIXEL_ID section with your Facebook pixel id.
<script>
fbq(‘set’, ‘autoConfig’, ‘true’, ‘PIXEL_ID’);
</script>
Step 2 – Implement Schema Markup Including the Required Facebook Data
You can use the below HTML but will need to replace the capitalized variables with your websites variables for those items. Make sure this data is present on every product page. I’ve also included the actual script you would use below if your website is currently on BigCommerce, both the Stencil and Blueprint versions.
<meta itemprop=”brand” content=”BRAND_NAME_VARIABLE”>
<meta itemprop=”name” content=”PRODUCT_TITLE_VARIABLE”>
<a itemprop=”url” href=”Product_URL_VARIABLE”></a>
<img itemprop=”image” src=”MAIN_PRODUCT_IMAGE_URL_VARIABLE” alt=”IMAGE_ALT” />
<span itemprop=”description”>PRODUCT_DESCRIPTION_VARIABLE</span>
<meta itemprop=”productID” content=”PRODUCT_ID_VARIABLE”>
<span itemprop=”offers” itemscope itemtype=”http://schema.org/Offer”>
<link itemprop=”availability” href=”http://schema.org/InStock” />
<meta itemprop=”itemCondition” itemtype=”http://schema.org/OfferItemCondition” content=”http://schema.org/NewCondition” />
<div class=”product_price” itemprop=”price”>PRODUCT_PRICE_VARIABLE</div>
<meta itemprop=”priceCurrency” content=”USD”>
</span>
</div>
BigCommerce Stencil:
Template file: description.html
You can copy and paste the below HTML in the above theme file.
(Templates > Components > Products > description.html)
<meta itemprop=”brand” content=”{{product.brand.name}}”>
<meta itemprop=”name” content=”{{product.title}}”>
<a itemprop=”url” href=”{{product.url}}”></a>
<img itemprop=”image” src=”{{getImage product.main_image ‘product_size’}}” alt=”{{product.title}}” />
<span itemprop=”description”>{{product.description}}</span>
<meta itemprop=”productID” content=”{{product.id}}”>
<span itemprop=”offers” itemscope itemtype=”http://schema.org/Offer”>
<link itemprop=”availability” href=”http://schema.org/InStock” />
<meta itemprop=”itemCondition” itemtype=”http://schema.org/OfferItemCondition” content=”http://schema.org/NewCondition” />
<div class=”product_price” itemprop=”price”>{{product.price.without_tax.value}}</div>
<meta itemprop=”priceCurrency” content=”USD”>
</span>
</div>
Blueprint:
Theme file: productdescription.html
You can copy and paste the below HTML in the above theme file.
<meta itemprop=”brand” content=”%%GLOBAL_ProductBrand%%”>
<meta itemprop=”name” content=”%%GLOBAL_ProductName%%”>
<a itemprop=”url” href=”%%GLOBAL_ProductURL%%”></a>
<img itemprop=”image” src=”%%GLOBAL_ThumbImageURL%%” alt=”%%GLOBAL_ProductName%%” />
<span itemprop=”description”>%%GLOBAL_ProductDesc%%</span>
<meta itemprop=”productID” content=”%%GLOBAL_ProductId%%”>
<span itemprop=”offers” itemscope itemtype=”http://schema.org/Offer”>
<link itemprop=”availability” href=”http://schema.org/InStock” />
<meta itemprop=”itemCondition” itemtype=”http://schema.org/OfferItemCondition” content=”http://schema.org/NewCondition” />
<div class=”product_price” itemprop=”price”>%%GLOBAL_RawProductPrice%%</div>
<meta itemprop=”priceCurrency” content=”USD”>
</span>
</div>
Step 3 – Add Your Facebook Pixel as a Product Data Source
NOTE: After adding your schema to your product pages it can take anywhere from 1-7 days before Facebook will allow you to add the pixel as a data source. Facebook will first need to see multiple instances of your microdata prior to allowing you to add it. If it still hasn’t gathered enough data you’ll see the pixel greyed out and it will say not ready.
In your Facebook catalog, you’ll first want to make sure that your Facebook pixel is connected, you can check this by going to Settings > Event Sources and you should see your pixel ID listed. If you don’t see it make sure to add it.
Next, in your Facebook catalog you’ll want to go to Product Data Sources > then Add Data Source. Select “Import Automatically From Website” then find your pixel and connect it.
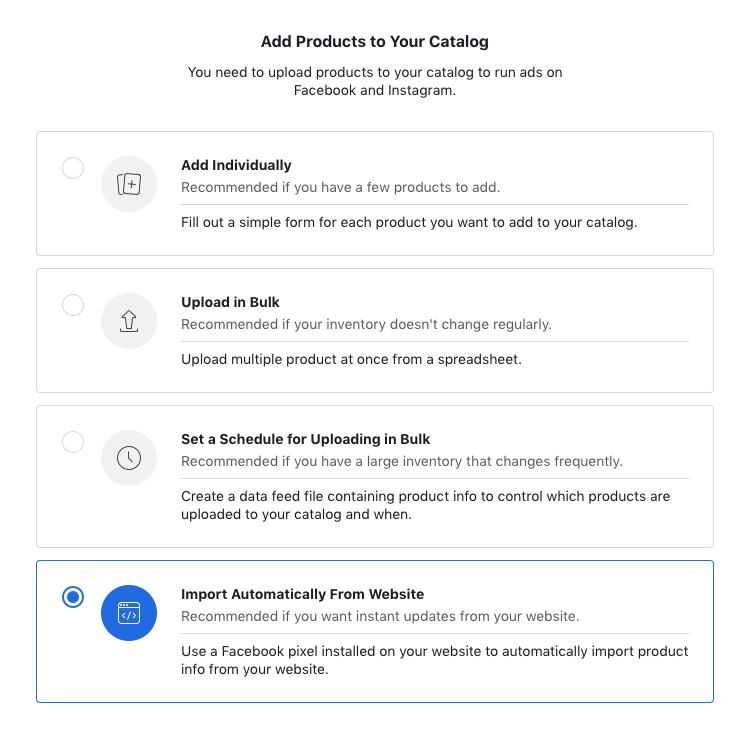
IMPORTANT: Once you have it connected you’ll want to click into it and go to the settings section and turn on the desired settings. We set ours to “Add New Products” and “Update Existing Product Info” but left “Remove Deleted Products” off.

Once that is set up Facebook will now start adding and/or updating your products as website users visit your product pages.
Helpful Resources
Link for required Facebook Microdata: https://www.facebook.com/business/help/1175004275966513
Google Schema/Structured Data Testing Tool Link: https://search.google.com/structured-data/testing-tool/u/0/
Google Structured Data Markup Helper: https://search.google.com/structured-data/testing-tool/u/0/
If you’re having trouble setting up for Pixel as an event source feel free to reach out for help or comment on this post.
Don’t forget to follow us on Facebook as well as subscribe to our blog.
Ready To Grow?
Let's Talk!
