
How To Create A Product Catalog For Facebook Dynamic Ads
Using Facebook and Instagram advertising is an easy and effective way to reach new audiences. Through dynamic ads you can provide highly relevant content and allow users to shop your site or discover new products directly on their Facebook news feed. To do this, you need to create a Facebook Catalog.
According to Facebook, a catalog holds information about the items in your inventory, which you can use to promote across Facebook, Instagram, Audience Network and Messenger. Facebook has four types of catalogs including e-commerce, travel, real estate, and auto.
Once you have a Facebook Product Catalog, you can also capture website behavior using Facebook pixel events like View Content, Add to Cart, and Purchase to create custom audiences, zeroing in on targeted users for your ads.
Keep reading to learn how to properly set up a Facebook Catalog and how to ensure your catalog sets your ads up for success.
Creating a Facebook Catalog
Step 1:
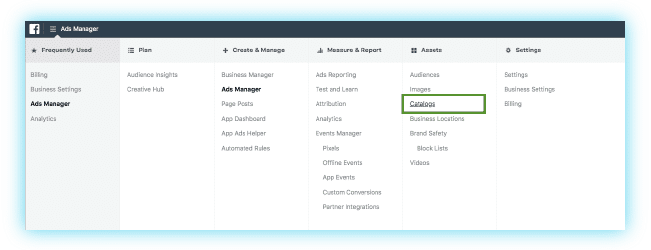
Click the hamburger menu in the upper left corner in Business Manager, and under Assets click Catalogs.
Step 2:
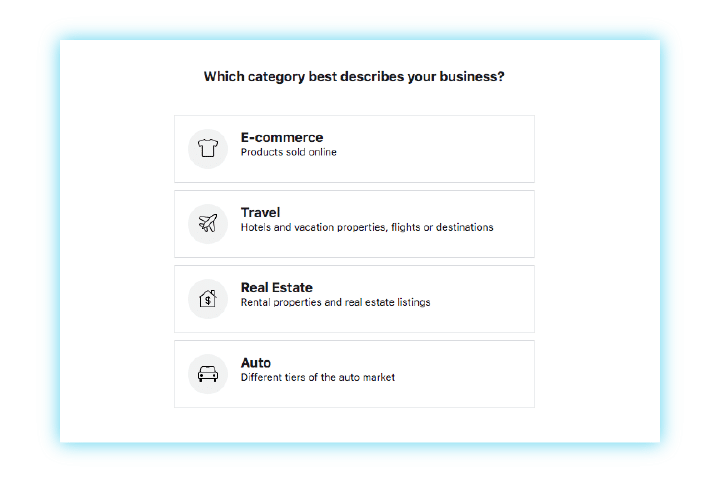
Next, select the category that best describes your business and click, Next.
Step 3:
Choose how you want to add products to your catalog and give your catalog a name. Click, Create.
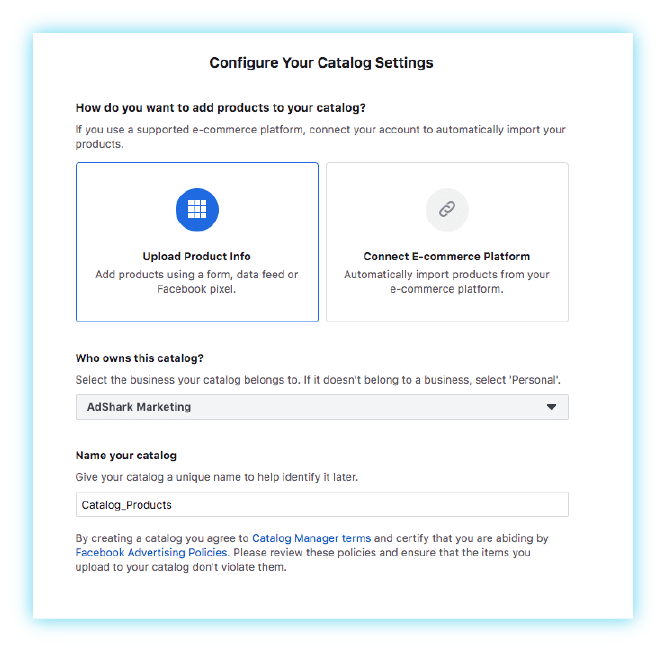
Pro Tip: In most situations, you’ll want to select Upload Product Info. We tried to using Connect E-commerce Platform with BigCommerce and Shopify sites but haven’t had a lot of success with this feature.
Setting Up Your Facebook Catalog
Connecting an Event Data Source
Connecting the event data source to your pixel tells Facebook who is visiting your site, what products they viewed, and the specific actions they took—products viewed, searched for, added to cart or purchased.
If you don’t have the View Content, Add to Cart and Purchase pixel events set up you won’t be able to create dynamic product ads. To set up these pixels read our Guide to eCommerce Facebook Pixel Events for specific instructions.
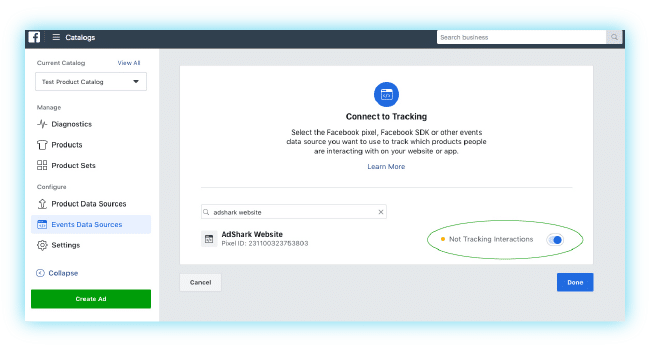
Go to Catalog Manager by selecting the catalog name. Go to Configure > Events Data Source.
Find the Facebook pixel live on your website and toggle the button to start tracking interactions, then click Done.
Add a Product Data Source
Now it’s time to add your product data source. To do this, go to Configure > Product Data Sources. Next, click the Add Products button.
Here, you can choose Add Manually, Use Data Feed and Connect Facebook Pixels.
Add Manually
You can use this option however we recommend Use Data Feed because this option takes the longest. Facebook suggests using this option if you less than 50 products.
To upload manually, select Add Manually, then click, Next.
Click Upload File and select an image for your product, then click open. Fill out the following field: Name, Description, Content ID, Website link, and Price.
Click Add Product. Repeat this process for every product you have. You need to have a minimum of four products in your catalog.
Use Data Feeds
We use data feeds as our main option when setting up Facebook Product catalogs. When using data feeds, you can select Set a Schedule or Upload Once. We will walk through both options.
To add products to your catalog using a data feed, go to Product Data Sources > Add Products > Add New Products.
Select, Use Data Feeds and click, Next.
Choose how you want to upload your feed. If your inventory doesn’t change that often, select Upload Once.
Upload Once
This is the option you would use if you are uploading a manually created CSV file. We walk through creating and formatting a CSV for your data feed.
Drag and drop your inventory CSV from your computer and select Start Upload.
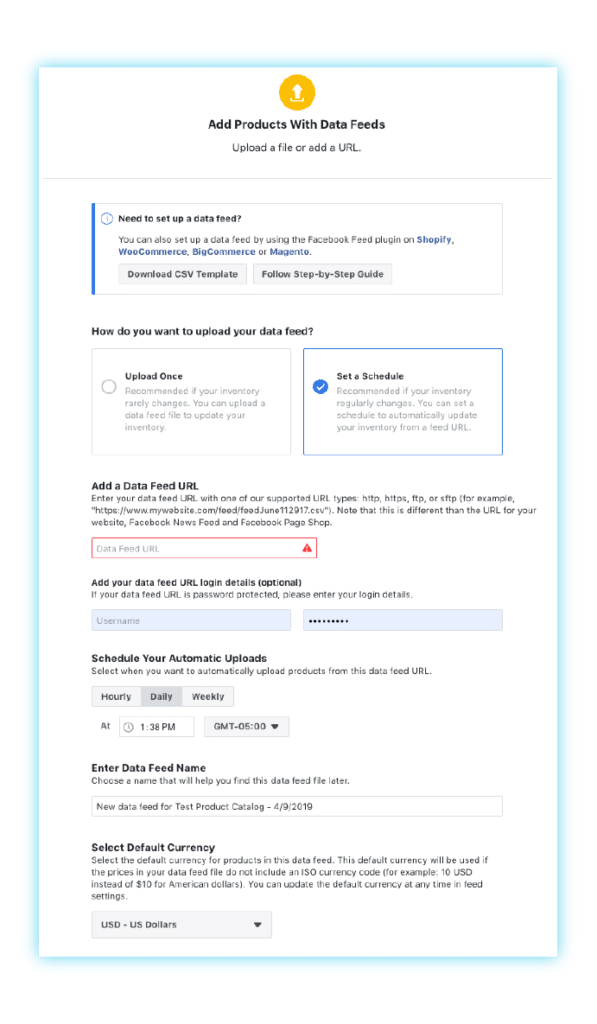
Set A Schedule
Setting a schedule allows you to add a URL with your product feed data and schedule how often it should update. Scheduling an automatic update of your product data feed eliminates extra effort to manually update that information, saving time.
You can also use third-party automation tools like, Go Data Feed, to update your Facebook catalog with data directly from your website. Before you set your schedule, you need to format your product catalog import and upload it to an FTP or third-party platform, which is where Go Data Feed comes in.
To add products to your catalog using a data feed, go to Product Data Sources > Add Products > Add New Products.
Select, Use Data Feeds and click, Next.
Click Set a Schedule.
Now you need to enter your Data Feed URL, login details (if applicable), and select the schedule for your automatic uploads. Next, choose a name for your data feed and choose your default currency and click, Start Upload.
Connect Facebook Pixel
Facebook give users this option in order to allow for the Facebook pixel to automatically create and update product via microdata on your site through your Facebook pixel.
We have tried this method a few times but haven’t had much success and routinely run into issues.
To set up this up, go to our Update Facebook Product Feed With Facebook Pixel Microdata blog post.
Formatting Your Facebook Product Catalog Import CSV
In order to upload your product feed to your Facebook product catalog you’ll need to format your product data according to Facebook Feed requirements.
Pay close attention to the “Id” and “item_group_id” fields. This number needs to match your “ViewContent” event content id for dynamic ads to work.
If your content type within your “ViewContent” event is “product” then Facebook references the “id” field to match.
If your content type is “product_group” then Facebook will reference “item_group_id” to match a product view to your catalog.
If you’re not sure what events are firing I highly recommend installing the Facebook Pixel Helper Chrome extension for the Chrome browser.
Sample Facebook Import Sheet: Facebook Sample Product Feed (simplified)
Check out our BigCommerce product feed, blog post for specific information on your BigCommerce product feed. Below are the required Facebook Product Feed fields and a description of the allowed values.
| Facebook Catalog Import Fields | Recommended FB Import Values |
| Id | Unique ID for the item. Used when content type is “product” and not “product_group”. |
| title | Title of item. Max size: 100 |
| description | Short text describing the product. Max size: 5000 |
| product type | User generated (recommend using product categories) |
| link | Link to your product page where a user can purchase the item. |
| image link | Link to item image used in the ad. Aspect ratio recommended is 1:1 and image size minimum is 500px x 500px. |
| condition | new, used or refurbished |
| availability | in stock, out of stock, preorder |
| price | Cost of item and currency. Example: 9.99 USD |
| Gtin, mpn, or brand (need one of these) | Recommend using brand name or MPN if you don’t have GTINs |
| item_group_id | Used when you have product variants with one product page for those variants. If your ViewContent event content type is “product_group” then the catalog will match the content ID to this number. |
Now that your data is formatted properly you can upload your CSV to Facebook.
After uploading your product file, go back to Product Data Source. In the overview tab you can review details about your import to see if there were any issues or warnings preventing products from being uploaded.
It may take some time for Facebook to update depending on how large your product file is, but you should be able to see the products you imported under Products. To see data associated with a product, click on a product.
Verifying Your Facebook Pixel & Catalog Are Working
Dynamic ads use a template, that you create, to automatically pull images and details from your data feed. Connecting your product catalog with your Facebook pixel allows you to target users with ads for products they recently viewed on your website.
In order to do this, you’ll need to first make sure you’ve implemented the proper events on your website. You need to set up ViewContent, AddToCart and Purchase Facebook events.
BigCommerce sites have specific instructions, which we covered in our Dynamic Product Ads on BigCommerce post.
Verifying Your Pixel Events & Catalog
Using the Facebook Pixel Helper Chrome extension, you can verify if your events are firing and matching to the data uploaded to your Facebook Catalog.
Go to your product page on your website. Click on the Pixer Heleper extension and scroll down to “ViewContent”. To see the “content_type“ and “content_id” expand “ViewContent”.
Content type should be either “product” or “product_group” and the content_id should be the unique product identifier that would match to your product upload file.
At the bottom, you should also see “Matched Products”. If the product ID number is in that field then your catalog and pixel are set up properly.
Now you want to test your AddToCart and Purchase events to ensure they are also working.
Viewing Pixel Event Data
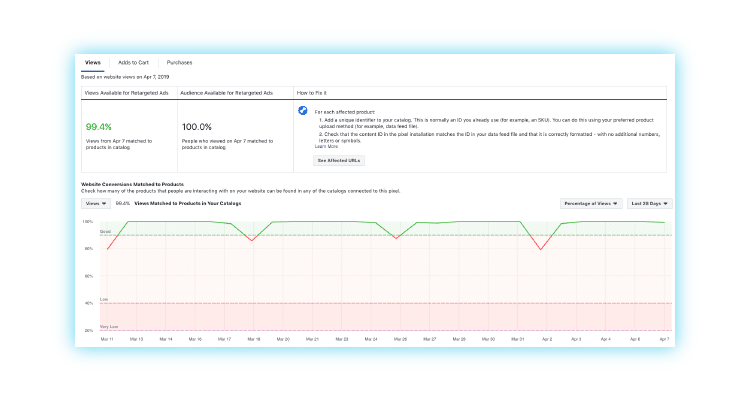
Now that your pixel events have been correctly firing and matching to your product catalog for a couple of days, you can view your past events and see how often they are matching to your product catalog. You can also see the actual parameters that were passed with the event to help you troubleshoot if you’re having issues matching events to your catalog.
To view this information, go to Catalogs > Event Data Sources.
This shows you how many events were passed and the match rate for those events. You can also see any content Ids that aren’t matching or specific URLs with issues matching content Id.
Troubleshooting the Pixel Events
Don’t see the ViewContent event
If you don’t see the event then you have not implemented the events on your product page and you will likely need to work with a developer or contact us to get that set up.
Content Ids are empty
If product ID is empty then the event is properly passing the ID variable on your product page.
Content Type & Content Ids Work But It Didn’t Match
This will be the case if either the content id on the page doesn’t match a correct id field in your product file or your using product_group for content_type and don’t have the same id numbers in your item_group_id field.
If you are using “product_group” for your content_type and have the proper ids in the “id” field in your product file you can simply copy those ids into the “item_group_id” field and re-upload your product file.
Once you’ve figured out the problem and have the ViewContent event working you’ll want to repeat these steps to test the AddToCart and Purchase events.
How Can AdShark Marketing Help?
Dynamic product ads are essential for ecommerce marketing. We have many clients using a Facebook Catalog for dynamic product ads and our digital marketing specialists have expertise in connecting multiple platforms. If you are struggling to get yours working, fill out our form and we can help you out. Ready to start using advanced targeting in your Facebook ads, but don’t know where to start? Set up a discovery call to work with our team of experts.
Ready To Grow?
Let's Talk!
