
How To Design Google Responsive Display Ads In 4 Easy Steps
If you listen closely you’re bound to hear a peculiar sound. That’s the sound of graphic designers and agency creatives gasping across the globe after Google Ads announced its making responsive display ads their default ad type for the Display Network (GDN). But luckily for skilled creatives and designers, we are used to sudden changes in the industry and can easily adapt and overcome.
The days of creating dozens of different variations of an ad, all at various shapes and sizes, are coming to an end and the process is becoming more efficient. Unfortunately, the change will result in fewer companies being able to use the Display Network effectively with its new restrictions, but for most companies, this is a welcome change.
Need help with learning how to design for these new ads? We’ve put together a how-to guide with our best practice tips to make the transition as easy and painless as possible. Read on to get started and let us know if we missed anything that we may have left unanswered.
What’s In This Post?
- The Anatomy of Responsive Display Ads
- Choosing The Images
- Choosing The Logos
- Writing The Text
- Reviewing Responsive Display Ads
- Tips To Improve Your Ads
The Anatomy of Responsive Display Ads
In the past, designers had specific sizes they had to design their ads in. They needed to craft each size by hand, and it was up to the designer or advertiser to lay them out. Google now simply asks you to upload the individual assets and it will responsively adjust those assets to fill whatever ad size it requires.
Let’s go over what those individual sections are:
The Images
Google needs two variations of an image (or two separate images) that it will use to populate the image section of the ad. We will go over how to design and decide on those images below, but simply put, you’ll need a landscape image and a square image for the ad.
The Logos
Google needs two variations of the company logo to populate the logos section of the ad. We will go more into depth on this below, but just know you should use a landscape version of your logo as well as a square version.
The Text Areas
Google provides a few lines for you to fill your ad with any needed information. Here you will have a headline (a short version and longer version is needed), a description, the business name and the ad URL. Depending on the ad size, the text displayed will vary.
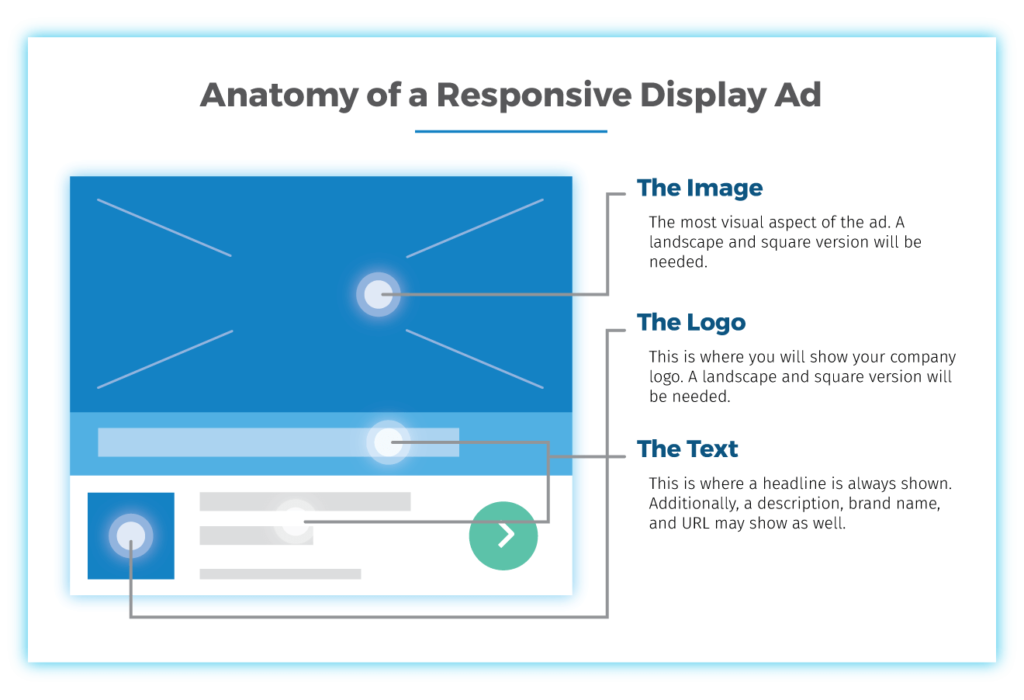
The Anatomy of a Standard Responsive Display Ad
Choosing The Images
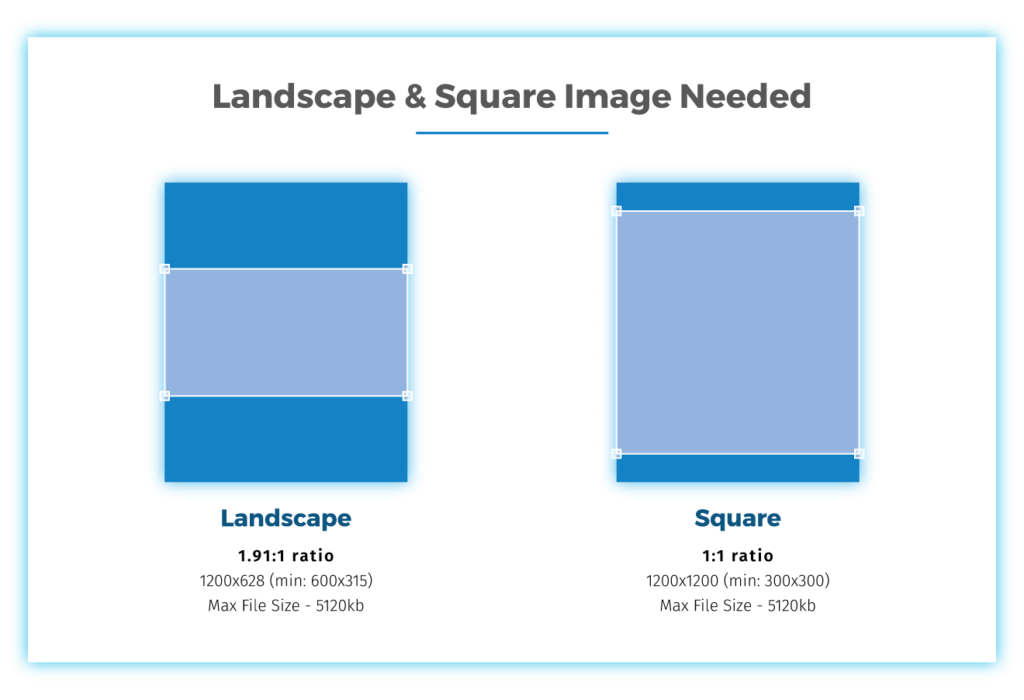
Each Responsive Display Ad campaign now needs two images. One landscape image (1.91:1) and one square image (1:1). Depending on your image, you can use the same for both the landscape and the square version or you can choose two completely unique images. Google may give you the option to make one of them optional, but we highly recommend choosing an image for both to assure the ad will look great at all sizes.
Each Responsive Display Ad needs 1 landscape and 1 square image.
While only one landscape and one square image are needed, you can choose as many images for the ad as necessary. There are a couple of ways to choose images:
Scan Website
Enter a URL for the webpage you want to grab images from. Google will scan that URL for any usable images and will allow you to choose from what it finds.
Not seeing the image you’re looking for? It probably isn’t showing because it doesn’t meet the size restrictions that are mentioned below.
Click on the image and select ‘image’ from the drop-down menu. Now you have the option to select landscape, square, or both. You can then set cropping for the options you decide on.
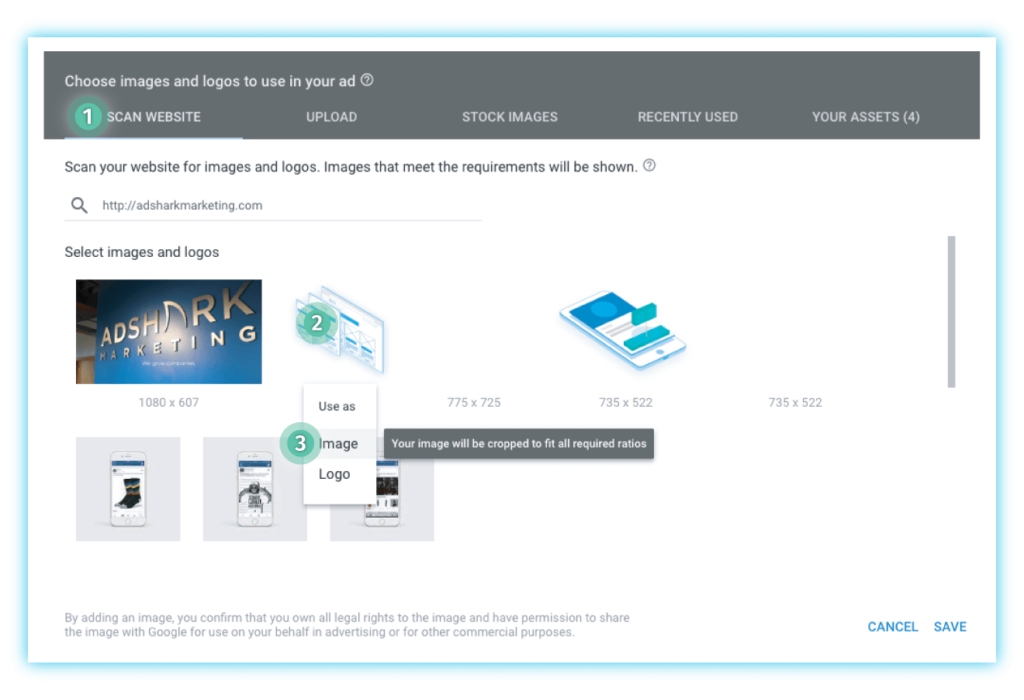
After Google scans the page, choose an image for the ad.
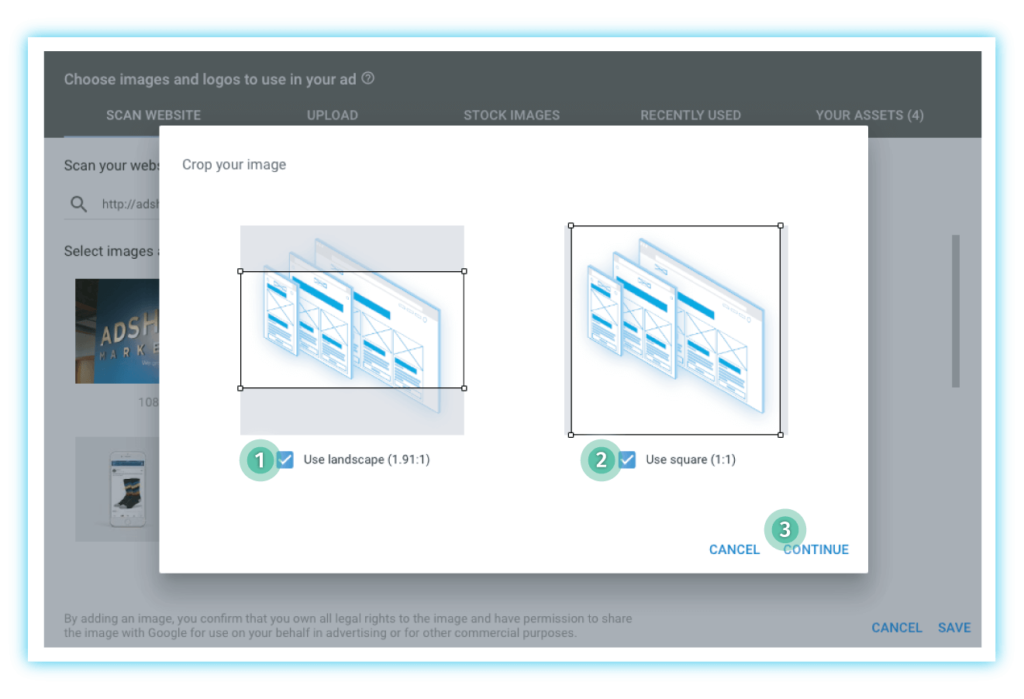
Select which orientation you want to use the image for (or both), then press continue and save.
Here are a few things to note as you choose images:
- Dimensional and File Size Restrictions
- Landscape (1.91:1) Ideal dimensions are 1200 x 628. Minimum dimensions are 600 x 314. Max file size is 5120kb.
- Square (1:1) Ideal dimensions are 1200 x 1200. Minimum dimensions are 300 x 300. Max file size is 5120kb.
- Image File Type Keep an eye on what type of file you grab from the website. If the file is a .png with a transparent background, Google will fill the background with black which may not work for your ad.
- Consider the Display Size Even if you choose a large file size, keep in mind that Google displays this image in all kinds of different shapes and sizes. Ask yourself if anything in this image will cause problems if it is cropped out or if the image will be unrecognizable at a smaller size.
- Don’t Ignore Copyright Make sure to only use images that you have the rights to use. Google (and AdShark) are not responsible for any copyright infringements.
Pro Tip: Make sure images grabbed from a site are good enough quality to look great at larger sizes. A pixelated image can instantly make an ad look cheap and unprofessional. We recommend formatting and uploading the image with the highest quality possible to avoid any issues.
Upload
This is likely the tab you will use most often. It’s also the option we suggest using in order to assure the best quality images with the best cropping possible.
Simply upload images by dragging them into the upload box or clicking the “Choose Files To Upload” button and find the image in your files. From here, click the image in the upload box and select “Image.” Choose to use the image for landscape, square, or both and set how you would like the image cropped. If you’ve already done this outside of Google Ads, then this should be extremely simple.
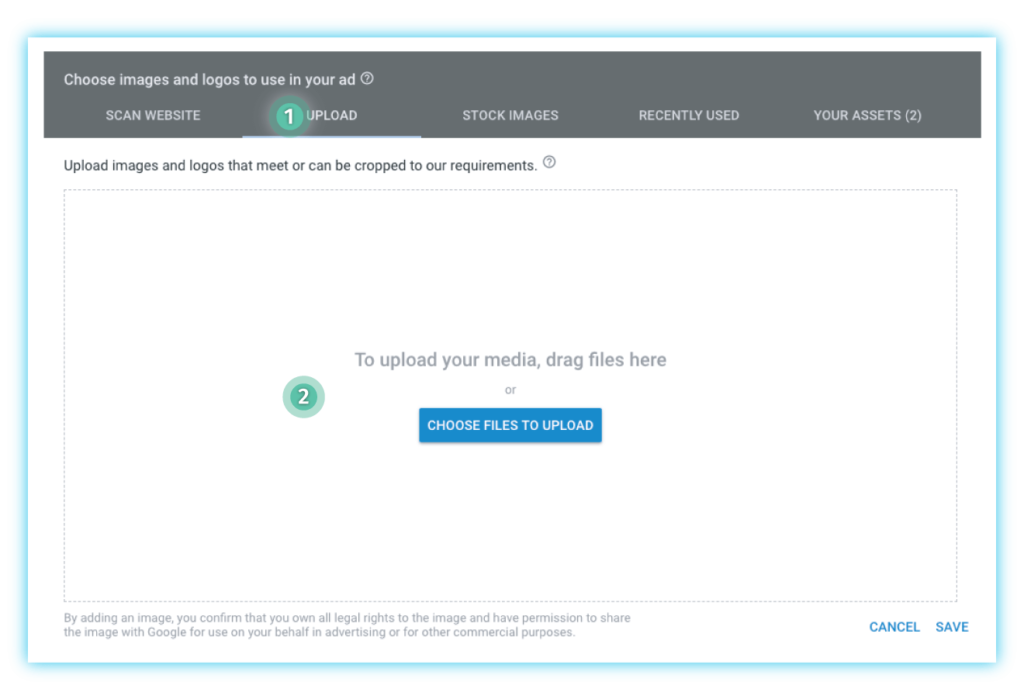
Select ‘Upload” and either drag media onto window or click to choose files.
Refer to our Scan Website section for size requirements and other notes on selecting images.
Stock Images
Need to grab a quick reference image? The ‘Stock Images’ tab is for you! Here you’ll be able to search Shutterstock’s massive image library for watermarked versions of their photos. It’s important to note however, any images selected here will have the watermark in your final ads. You will need to purchase rights to the image and download it from Shutterstock if you need the unwatermarked version. Then use the upload tab to bring it into Google Ads for use.
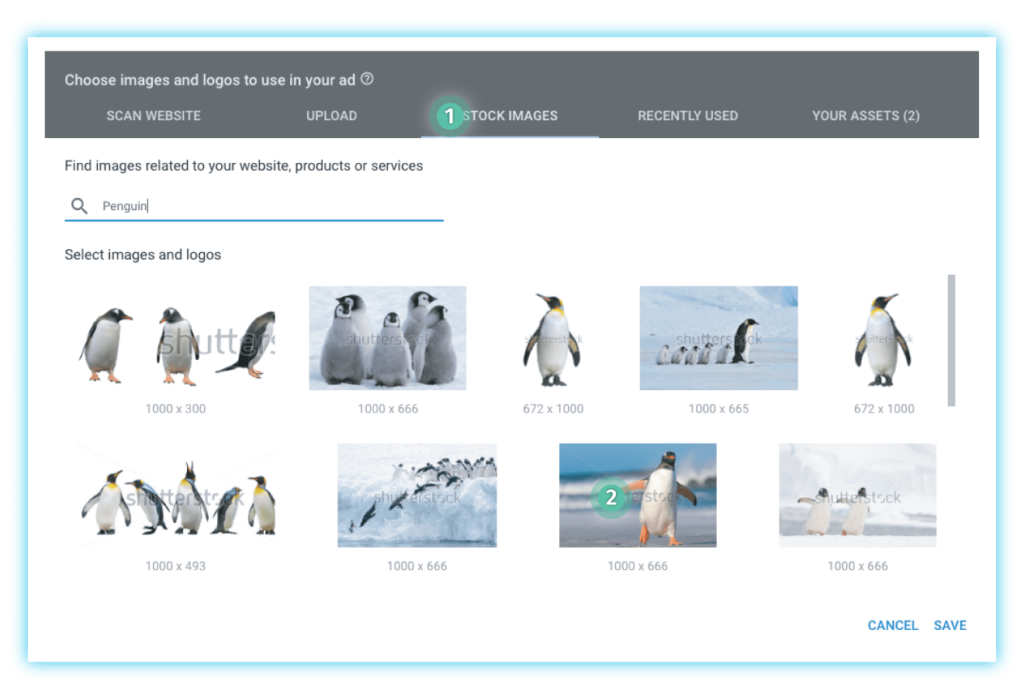
Select “Stock Images” and search for an image. While we are big fans of sharks… we also have a soft spot for penguins
Recently Used
This tab is where any recently used images will appear. This is extremely helpful if you are making many different ads for the same business or client and need to find images as quick as possible.
Your Assets
Here is where any already selected images will appear in case you want to make quick work of sorting through them or make additional edits.
Choosing The Logos
Each Responsive Display Ad campaign will need two versions of a logo. One version will be in landscape orientation (4:1) while the other will be square (1:1). We suggest uploading two separate variations of the logo instead of using the same logo and just changing the cropping. The landscape version should be designed to fill the landscape space as much as possible while the square version should fill the square space as much as possible.
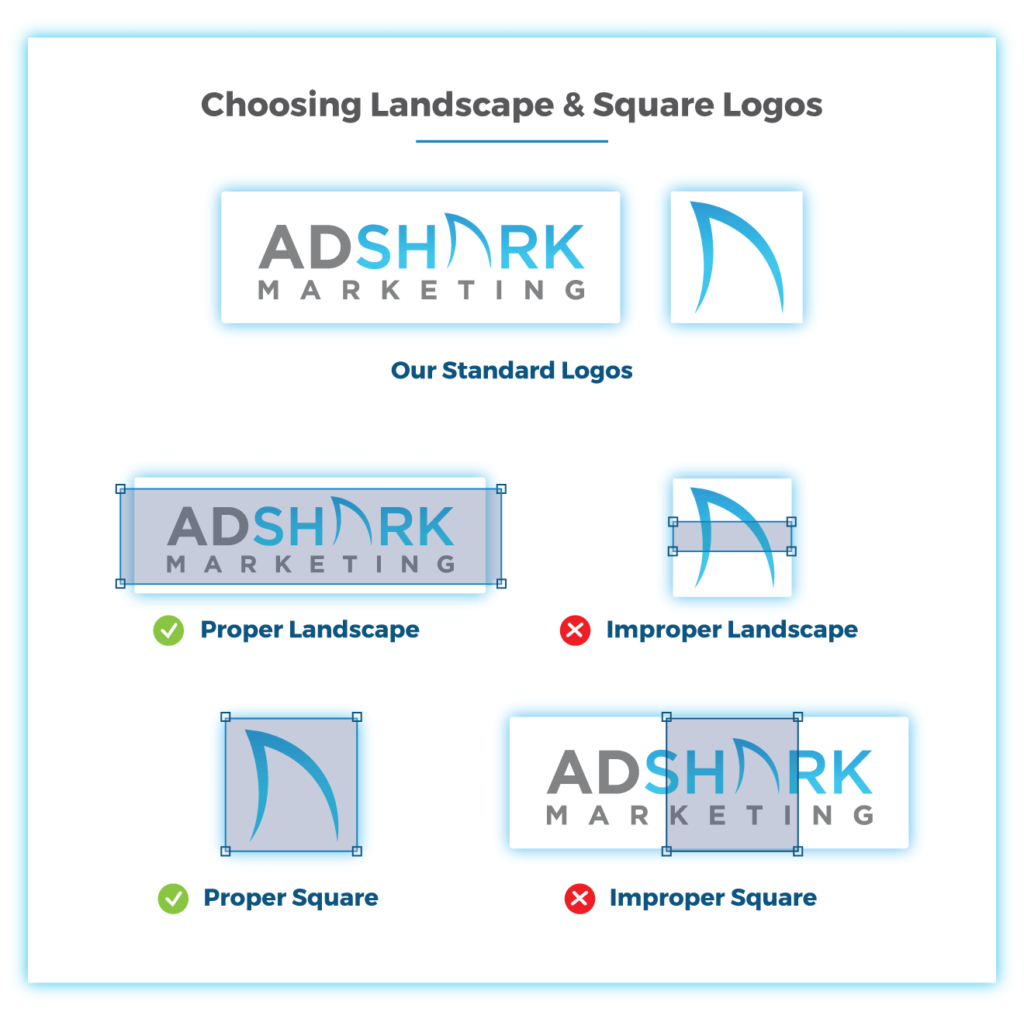
Use specific variations of a company logo to best fill each option.
Working with a company logo can be difficult as branding is typically strictly set and not open to changes. Do your best to maintain company brand standards and restrictions while making the logo work with Google’s needed variations. Google will allow using only a landscape version of the logo, but this will limit your ads exposure. We highly suggest making the logo work in a square variation to maximize exposure and therefore results.
Here are a few things to note as you choose images:
- Dimensional and File Size Restrictions
- Landscape (4:1) ideal dimensions are 1200 x 300. Minimum dimensions are 512 x 128. Max file size is 5120kb.
- Square (1:1) ideal dimensions are 1200 x 1200. Minimum dimensions are 128 x 128. Max file size is 5120kb.
- Consider the Display Size of the Logo The space Google uses for the logo is relatively small. Consider the size your logo will be viewed at and ask yourself if the logo is readable and identifiable.
Pro Tip: We recommend uploading logo files at the max dimension size to ensure the highest quality possible. No one wants their brand or company logo looking blurry or pixelated.
Writing The Text
With Responsive Display Ads, there are a few different options to feature your copy. Google Ads has 5 areas of copy which are listed in detail below:
- Headlines (25 Characters Max) Responsive Display Ads allow you to add up to 5 “short” headlines. You need to add at least 1 version, but we suggest adding as many versions as you can in order to test to see which ones work the best for your campaign.
- Long Headline (90 Characters Max) In larger ad sizes, a longer headline with up to 90 characters is allowed.
- Descriptions (90 Characters Max) This is additional space for more information in the ad. Google allows you to enter up to 5 different descriptions. Here is where you can get a bit more in-depth with the ad and what it’s about.
- Business Name (25 Characters Max) Pretty much exactly what it says. This is where you can put the name of your business. We suggest abbreviating when your business name is too long for the limited character space.
- Final URL | This is the URL that you will want the ad to go to. This URL will not show in the responsive display ad.
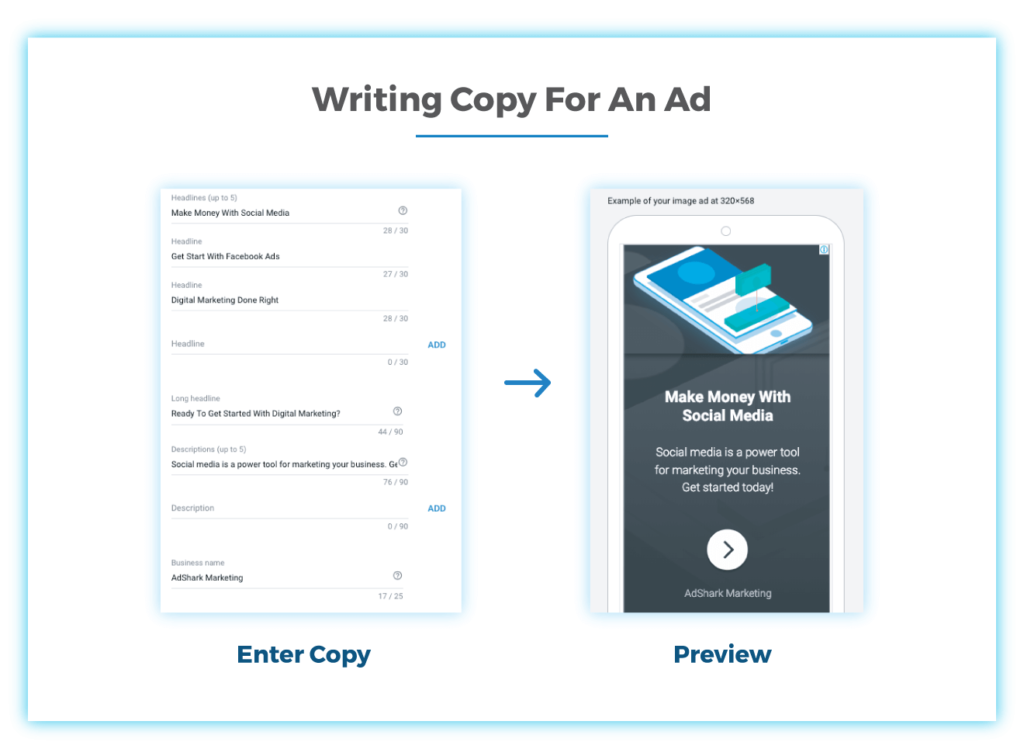
Google will randomly generate visuals of your ad as a preview.
Keep It Short
When writing the copy for your ads, do your best to keep it as short as possible. Of course, you’ll want to write copy that both attracts viewers as well as uses keywords pertaining to the ad. It’s important to remember that people just simply don’t want to read ads. Keep the copy short and to the point. No need for extra fluff here.
Additionally, depending on the size of the ad, Google Ads may cut off the end of your headline or description if it doesn’t fit. By keeping the copy short, you can avoid this as much as possible.
Pro Tip: Try writing down any words that are absolutely necessary
to make the ad work. Once you have those, prioritize them and make sure the most important ones make it into your headline. Try to make a short sentence using those words with as little extra copy as possible.
Prioritize The Copy
Google prioritizes the headline over the description. In some cases, the description will not appear at all. It’s important to keep any critical information in the headline so that the ad makes sense and “gets the job done” when there is no description to support it.
Mix N’ Match Copy
If you decide to enter more than one headline or more than one description, it’s important to remember two things.
- Google will never show two headlines and two descriptions together.
- Google will try to mix and match headlines with descriptions to best meet the viewers expected needs.
This means that as you write copy, do your best to figure out the different combinations and assure that all combinations make sense and accomplish what you need them to do.
Reviewing Responsive Display Ads
With Responsive Display Ads, there is a seemingly endless number of ways your ads could appear across the web. That’s part of what makes this new ad format so exciting (and somewhat intimidating). In order to avoid any errors and assure accuracy, we suggest reviewing your ads after you press ‘save’ to make sure everything appears to be in working order.

Navigate to the preview link for best review reference.
Here’s the best way to review your new Responsive Display Ads:
- Find the Ad in the Ad Account Navigate to the ad by going to the ‘Display campaigns’ tab on the left of your screen and then filter through your ads to find the ad that needs reviewing.
- Click On the Image of the Ad Hover over the visual of the ad and click to open the preview window. From here you’ll only be able to view the ad at 300 x 250 in three variations.
- Open the Link URL Click the URL that appears in this window. A new tab or page should open and here you will be able to see 4 versions of the ad. While this is nowhere near the number of possible sizes the ad could be viewed at, this will give you the best idea of how the ad will show at various sizes.
- Review and Share Use this URL to check for any errors or needed changes. If you are ready and need to send ads to your client, other designers or your boss for approval simply provide them with this page link and they can view the ads exactly as you see them.
Tips To Improve Your Ads
Hopefully, you’re a bit more comfortable with designing and creating ads for this new ad format. In some ways, things have become much easier even if it may take a while to get used to everything.
Here are a few last things to keep in mind when creating and designing Responsive Display Ads:
Carefully Craft And Consider The Image
Beside what was mentioned above about the ad image, take careful consideration into deciding on your ad image(s). The image is going to be the top player in grabbing a viewers attention. Make sure the image is directly related to what you are advertising and do your best to make it as attractive and noticeable as possible.
Pro Tip: Leave logos and extra copy off of the image. With the seemingly endless ways Google may crop your image, it’s too likely something will get cut off. There is already a spot for the logo and copy. Give your image the spotlight and let it do its job without added clutter.
Strategize The Ad URL
This is a no-brainer for ad professionals, but it’s important to mention. Getting someone to interact with an ad can be extremely difficult. If you are able to accomplish this, make sure that your ad is directly related to the page where you’re going to send them. No one wants to click an ad and then have to do detective work to find what they were looking for. By giving a user exactly what they were looking for right away you can greatly increase conversions and hopefully see tons of results.
Responsive Display Ads: Not For Everyone
One downfall of Google’s decision to focus on Responsive Display Ads is that they simply do not work for everyone. With limitations on images and text areas, some companies may not be able to get everything on the ad that they require.
Let’s say a bank wants to do an ad on low-rate car loans, but they are legally required to feature a disclosure that has 200-characters. Responsive display ads simply won’t work. There is no way to guarantee the entire disclosure will show and thus the ad will not be able to run. And that’s perfectly fine! Chances are if an ad is going to struggle to contain everything needed for the ad to show, then the ad would not have worked well
If you need help determining whether a Google Responsive Display Ad campaign is right for your business, just drop us a message and we can work together on figuring out what’s best for you.

Let’s Wrap-It-Up
Like the famous Sam Cooke song goes, “A Change is Gonna Come”, and just like the album’s title says, “Ain’t That Good News”. While this new display ad format has more restrictions than most are used to, by following our best practices, you should find Responsive Display Ads are more efficient and just as (if not more) effective.
How Can AdShark Marketing Help?
Let us know in the comments if you have any questions or any tips and tricks of your own!
Need help getting started with ecommerce marketing, digital marketing or running Responsive Display Ad campaigns? We have a team of hungry experts ready to run and design your Responsive Google Display Ad Campaign. Get in touch with us and let’s see how we can work together!
Ready To Grow?
Let's Talk!
