Setting Up Your Facebook Pixel – A Complete Guide
What’s in this Post?
- Facebook Pixel FAQ
- Creating Your Facebook Pixel
- Installing Facebook Pixel on Your Website
- Tracking Specific Actions with Facebook Pixel Events
- Verifying Facebook Pixel is Working
- Troubleshooting Your Facebook Pixel
- Advanced Targeting Strategies with Facebook Ads
- How Can AdShark Marketing Help?
Facebook Pixel FAQ
The Facebook pixel is code used to track the activity of your website visitors from a Facebook or Instagram ad. Once the data is captured, it is used to calculate metrics in your Business Manager account.
The code Facebook uses is automatically fired when your page loads. When the code is fired, Facebook is able to see information about the user’s location, browser info, IP address and device used. The data is then logged, and Facebook matches it to a unique Facebook ID number in their database. This allows you to create hyper-targeted campaigns and remarket to buyers with high-intent.
To install the Facebook Pixel on your website, you first need to create it within your business manager account. Then, you copy and paste the code into the header of your website, right before the </head> tag in the HTML.
Yes, Facebook Pixel is GDPR compliant. GDPR is data protection for European web users. Businesses, no matter where they are located, need to comply with GDPR if they process personal data about individuals in the EU. Facebook recommends installing a pop-up banner to require consent to use the pixel.
The Facebook Pixel and Facebook’s SDK work similar in that they both track user behaviors. The difference is that the Facebook Pixel is code you add to your website. The SDK is used for mobile apps to track user behavior.
Creating Your Facebook Pixel
Create Your Pixel
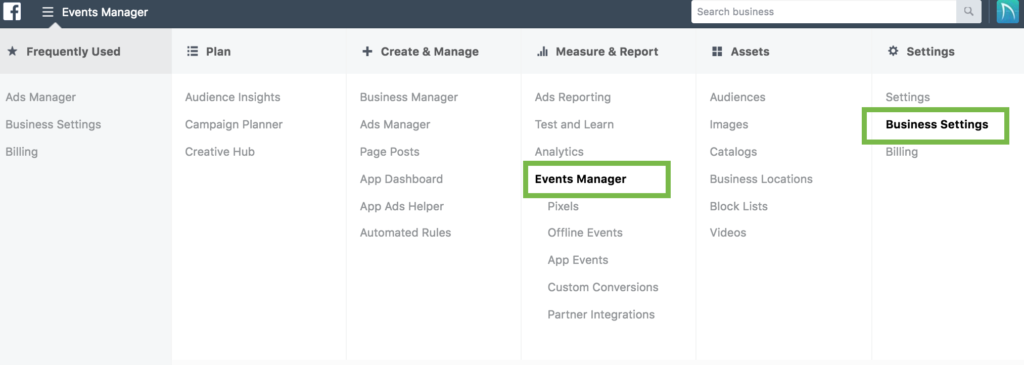
Go to Business Manager.
In the upper left corner, click the hamburger menu. Under Events Manager, click Pixels.
If you have access to more than one Facebook Ad account, make sure you select the correct account from the dropdown at the top left.
Click, Create a Pixel.
Name your Pixel, enter your URL and click, Create.
Installing Facebook Pixel on Your Website
You have three options for installing your new pixel to your website. You can install yourself, use a tag manager or platform, or have a developer install it for you. We’ll walk you through how to do each.
- I want to install my Facebook Pixel Manually
- I want to install my Facebook Pixel with Google Tag Manager
- I want to install my Facebook Pixel on WooCommerce
- I want to install my Facebook Pixel on Shopify
- I want to install my Facebook Pixel on BigCommerce
- I want to install my Facebook Pixel on Magento
- I want to install my Facebook Pixel on Wix
- I want to install my Facebook Pixel on Squarespace
Install Facebook Pixel Code Manually
Find the header code for your website.
Next, copy the pixel code and paste it into the header code, just above the closing </head> tag.
Turn Automatic Advanced Matching on or off.
After installing the Pixel code on your website, enter the URL and send a test to verify it’s working. Your status will say Active if the code was installed correctly.
Installing Facebook Pixel with Google Tag Manager
To install your pixel into Google Tag Manager, follow these instructions:
Log into your Google Tag Manager account.
Choose your website’s container and click, Add a new tag.
Click, Custom HTML Tag and choose a tag name.
Go to Events Manager and click, Details.
Click Set Up > Install Pixel > Manually add pixel code to website.
Hover over the code and click to copy.
Go back to Google Tag Manager, paste the code in the HTML container.
Click Advanced Settings dropdown and select Once per page under Tag firing options.
Under Fire On, select All Pages.
Click Create Tag.
Installing Facebook Pixel Using A Web Platform
To install your pixel on your website platform, find your platform and follow the instructions provided. If you don’t see your platform listed, feel free to contact us and we can help you get your pixel installed.
Installing Facebook Pixel on WooCommerce
First follow the steps to create a new pixel, if you haven’t done so already.
Then, in Business Manager under All Tools, select Partner Integrations under Events Manager.
Next, select WooCommerce. Then select, Connect Account > Pixel & Website Events. Select your existing pixel and click, Continue.
Choose if you want advanced matching on or off and download the pixel extension. Click continue. Log into your WooCommerce Account, go to My Site > Plugins.
Under Manage Plugins click Upload Plugin > Choose File and select, facebook-pixel-for-woocommerce-319149138996693.zip. Click, Install Now.
Once installed, click, Activate Plugin.
Check the installation by verifying the plugin.
Choose if you want advanced matching on or off and download the pixel extension. Click continue. Log into your WooCommerce Account, go to My Site > Plugins.
Installing Facebook Pixel on Shopify
First follow the steps to create a new pixel, if you haven’t done so already.
Then, in Business Manager under All Tools, select Partner Integrations under Events Manager.
Next, select Shopify. Then select, Connect Account. Select your existing pixel and click, Continue.
Choose if you want advanced matching on or off and click, Continue.
Log into your Shopify Account, go to Online Store > Preferences and copy and paste your pixel ID, click Save.
Verify your Pixel is working by sending test traffic to your site.
BigCommerce
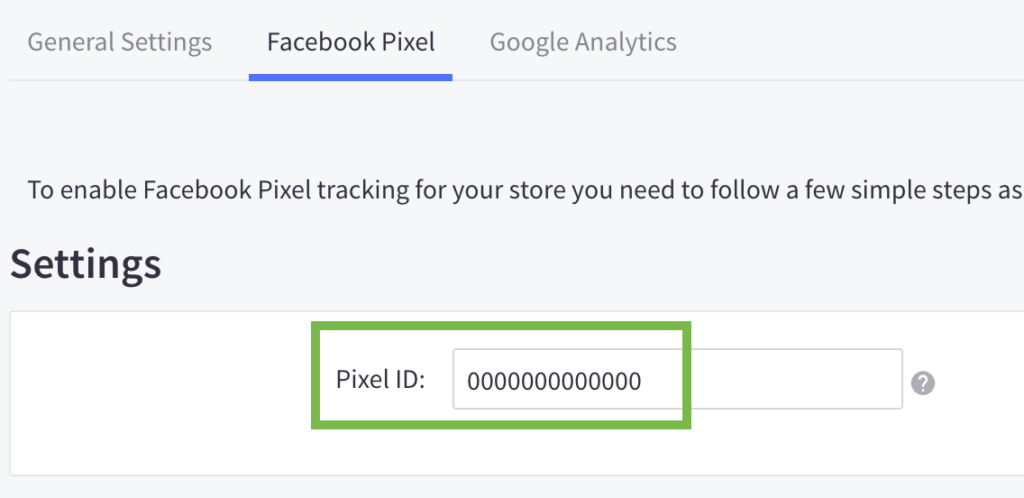
The first step is to add your Facebook pixel ID to your BigCommerce site. You can find your Facebook pixel in Facebook Business Manager under Events Manager or Business Settings > Data Sources > Pixels.
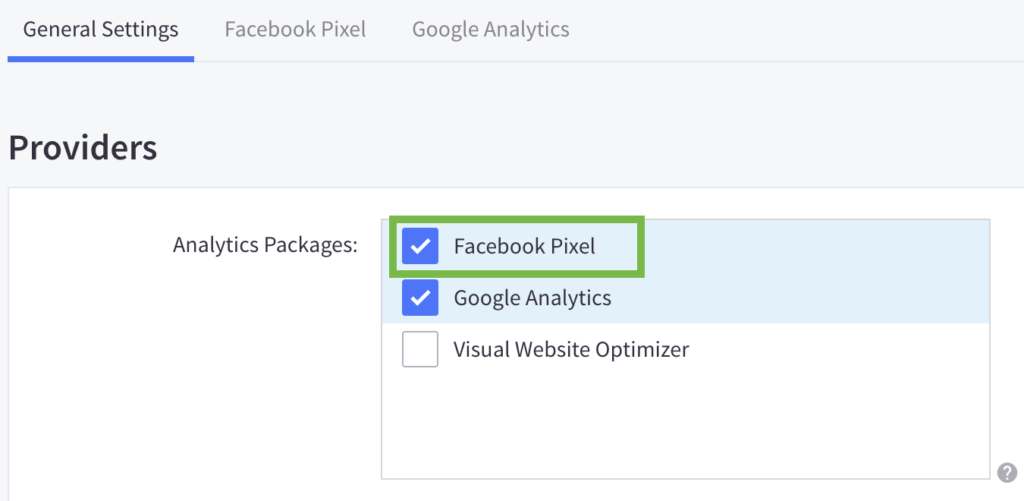
Copy your pixel ID and add it in your BigCommerce backend by going to Advanced Settings > Web Analytics > then make sure Facebook Pixel is checked which will allow you to click the Facebook Pixel tab and you can paste your pixel there.
However, if you want to add Pixel events, you need to complete additional steps. For more information on customizing your Facebook Pixel in BigCommerce, you can review our Complete Guide to Facebook Dynamic Product Ads & Product Feeds on BigCommerce.
Installing Facebook Pixel on Magento
First follow the steps to create a new pixel, if you haven’t done so already.
Then, in Business Manager under All Tools, select Partner Integrations under Events Manager.
Next, select Magento. Then select, Connect Account > Pixel & Website Events.
Next, download the Facebook Ads Extension. Then, log in to your Magento account. If you’re using the Magento compilation, you’ll need to disable it before installing your extension. To do this, go to System > Tools > Compilation.
Then select, System > Magento Connect > Magento Connect Manager.
Next, click, Choose File and select, facebook_ads_extension.ocmod.zip. If you previously installed the Facebook ads extension you will need to uninstall it before you can upload the new file.
Click, Upload. Now you can return to your admin panel in Magento and click, Facebook Ads Extension > Get Started. Follow the instructions to select your Facebook Page and pixel.
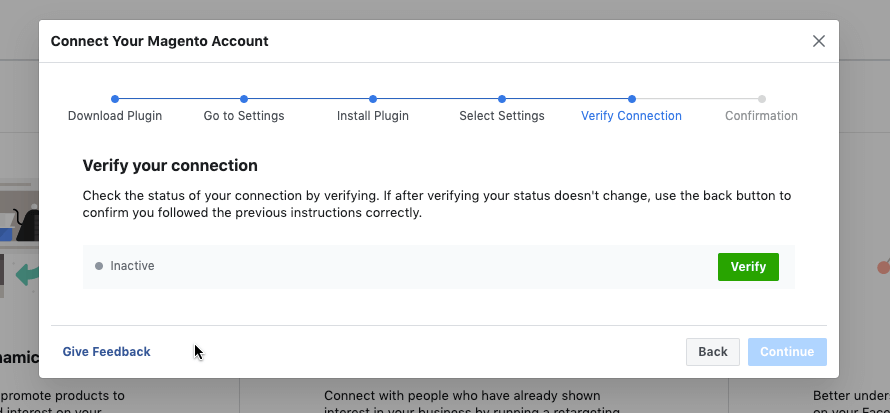
Go back to Facebook Partner Integrations to verify the connection.
Installing Facebook Pixel on Wix
First follow the steps to create a new pixel, if you haven’t done so already.
Then, in Business Manager under All Tools, select Partner Integrations under Events Manager.
Next, select Wix. Then select, Connect Account. Select your pixel and click, Continue. Turn your Advanced Matching on or off, click, Continue.
Log into your Wix account, select Marketing Tools > Marketing Integrations > Connect under Facebook Pixel. Now click, Connect Facebook Pixel. Copy and paste your pixel ID and click, Save.
Return to the Facebook Partner Integrations to verify the connection by sending test traffic to your website.
Installing Facebook Pixel on Squarespace
First follow the steps to create a new pixel, if you haven’t done so already.
Then, in Business Manager under All Tools, select Partner Integrations under Events Manager.
Next, select Squarespace. Then select, Connect Account > Existing Facebook pixel > Continue. Set your advanced matching to on or off and click, Continue.
If you’ve added your Pixel code to code injection, you will need to remove it to use the built-in integration.
To do so, log into Squarespace and select, Settings > Advanced > Code Injection.
Remove all the pixel code surrounded by:
<!-- Facebook Pixel Code -->
<!-- End Facebook Pixel Code -->
Now you can open a new tab and login to your Squarespace account. Under the Home Menu, click Marketing > Facebook Pixel & Ads. Add your pixel ID and click, Save.
Return to the Facebook Partner Integrations to verify the connection by sending test traffic to your website.
Tracking Specific Actions with Facebook Pixel Events
Now that you have the pixel installed on your site, you can add events. Facebook has standard events you can choose from, depending on what information you want to track.
What are Facebook Pixel Events?
Pixel Events are actions that happen on your website. Having the Facebook Pixel installed on your website allows you to track actions your customers take. This helps you understand your customer’s buying journey and provides insight into how your Facebook ads impact your bottom line.
Facebook Standard Events
| Event Name | Event Description |
| Add Payment Info | User enters payment information during the purchasing process |
| Add to Wishlist User adds products to their wish list | User adds products to their shopping cart |
| Complete Registration | User completes a registration form |
| Contact | User contacts your business |
| Customize Product | User selects a specific version of a product |
| Donate | User donates to your cause |
| Find Location | User searches for your physical location |
| Initiate checkout | User starts the checkout process |
| Purchase | User completes a purchase |
| Lead | User signs up for a trial or otherwise identifies themselves as a lead |
| Schedule | User books an appointment at your business |
| Search | User uses the search function |
| Start Trial | User signs up for a free trial |
| Submit Application | User applies for your product, service or program |
| Subscribe | User subscribes to a paid product or service |
| View Content | User lands on a specific page on your site |
To set up events on your website, go to Events Manager > Pixels > Set Up Pixel in Facebook Business Manager. Click, Manually Install the Code Yourself, then click, Continue.
Next click, Install Events and toggle which even you’d like to set up.
Now you need to choose between Track Event on Page Load or Track Event on Inline Action. On page load is used if the action takes the user to a specific page. Inline action is used if the action is to click something.
Add the parameters you’d like to measure for the event. This can include conversion value and currency.
Now you can copy this code and paste it on the relevant page of your site. For page load events the code can be placed below the closing header section of the page. With inline actions, place the code between the script tags next to the action you want to set up.
Repeat these steps for any other event you’d like to set up. You may need a developer to help set events up, or you can contact us to help you walk through the process.
Recommended Key Events
Different types of businesses need different types of Facebook Events added to their site, depending on what their ultimate goals are. Here are some recommended events for e-commerce companies and lead gen companies.
Recommended Facebook Events for E-commerce
Purchase Event
As an e-commerce company, the Facebook Pixel purchase event is very important. This code will specifically track past purchasers, allowing you to specifically retarget repeat customers.
This event will fire on the checkout complete page and requires the following values:
- Value Should be dynamic based on the order total.
- Currency Your currency code (ex. USD)
Pro Tip: You will need to work with an experienced developer to pass Dynamic variables with your Facebook events. Adding a dynamic value allows you to accurately log the cost of each purchase.
Add To Cart Event
The Add To Cart Event allows you to retarget to users who added a product to their cart but didn’t purchase. It also allows you to see which Facebook ads are resulting in adds to cart.
The add to cart event will fire on the product page when the user adds a product to their cart and requires the following values:
- content_type product or product_group
- content_id dynamic – unique product identifier (this should match the id in your catalog for content type product and match item group id in catalog for product_group.)
- Value dynamic – should pass product price
- Currency your currency code (ex. USD)
View Content Event
The View Content Facebook Event allows you to retarget users who viewed a particular product. You can use this event to retarget the same product in an ad on Facebook.
This event will fire on the product page load and we recommend the following values:
- content_type product or product_group
- content_id unique product identifier for that product
- Value product price
- Currency currency code
Complete Registration Event
With the Complete Registration Event, you are able to retarget users who’ve created an account and see what Facebook ads result in account creations.
This event will fire on account creation success page and requires only the pixel code:
<script>fbq(‘track’, ‘CompleteRegistration’);</script>
Recommended Facebook Events for Lead Gen
Lead Event
The Lead Event lets you segment users who have completed a contact form, free trial or lead form submission. It also allows you to track the Facebook ads that are converting leads.
This event will fire on a form success page and requires only the lead event pixel code.
View Content Event
The view content event allows you to retarget users who viewed a specific page, which could be a product or service page.
This event will fire on the page load and we recommend two options based on what type of business you have.
For Businesses Selling Products but Not Considered E-commerce
- content_type product or product_group
- Content_id unique product identifier
For Service Businesses
- content_category passes a text value based on the type of service the page is related to.
Example
If you have Facebook pixel helper installed on your browser you can see we pass a view_content event on this page for “facebook”.
This allows us to segment users who visit this page and retarget them with an ad about Facebook Ads or Setting up the Facebook Pixel – sneaky aren’t we. 😬
Verifying Facebook Pixel is Working
You want to make sure your Facebook Pixel is working. The best way is to install the Facebook Pixel Helper Chrome extension. Once installed, you should be able to see if the Facebook Pixel is installed, check for errors and understand the data coming from the pixel.
To install, go to the Chrome Webstore and, Add to Chrome.
Next, click Add Extension. The extension is located on the upper right corner of your toolbar, click to activate and refresh the page you want to verify.
Now you can confirm it’s working by clicking the icon and checking the pop up to see if the pixel is found on the page you are on. If it finds the pixel, there are no errors and you are ready to start creating ads with your pixel.
Troubleshooting Your Facebook Pixel
There are some common errors that happen during installation of the Facebook Pixel. Here are some of the common errors we’ve run into, if you need further help you can work with a developer or reach out to us for help.
ERROR: No Facebook Pixel Found
If you get the error message no pixel was found when verifying using pixel helper, then you need to add the code to the website. Find what platform you are using and double-check the setup was done correctly.
ERROR: Facebook Pixel Didn’t Load
If you get a didn’t load error, your pixel was found, but there is an issue receiving information from your website.
Check your pixel base code. You can try deleting what you already installed and reinstalling it based on the installation method you would like to use.
If you set up a dynamic event, like a button click, test the click and then recheck to see if that fixed it.
ERROR: Not a Standard Event
There is an error in the event code on your website. Verify the exact code names are used and if not, fix it within your website code.
ERROR: Pixel Activated Multiple Times
This error means your pixel is repeating the same signal to Facebook. Verify the code occurs only once per page and the event codes are used only once per page.
ERROR: Invalid Pixel ID
Your pixel ID isn’t recognized. Replace the ID in your base code with the correct ID active to your ad account.
ERROR: Product Missing From Catalog
Either content type is incorrect and thus not matching with either the id or item group id from your catalog. Or, the content_id being passed does not match an id from your product catalog
Advanced Targeting Strategies with Facebook Ads
Now that you have your pixel activated and your events running, you can work on developing advanced targeting strategies and improving your return on investment using Facebook Ads. If you’re an e-commerce store, you can use dynamic product ads to retarget users who visited your site, added products to their cart and didn’t checkout. Or, if you’re promoting an event and someone views the event page but doesn’t register you can retarget ads to them to register for the event.
There are multiple ways you can use the pixel to help increase sales, drive traffic and improve conversions.
How Can AdShark Marketing Help with Facebook Advanced Targeting Strategies
If you are unsure how where to start or would like help creating a customized strategy based on your goals, we can sit down with you to audit your current strategies and provide a map of how to help grow your sales and improve your conversion rates.
Ready To Grow?
Let's Talk!
